![]() Preparing
the impression for pouring:
Preparing
the impression for pouring:
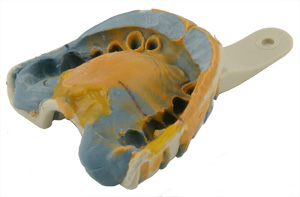
The anterior portion of the upper impression will often need trimming. Use caution not to trim away too much of the ridge, especially the labial portion.
Inspect the impression and be sure to block out all undercuts.
![]() Try
not to modify any portion of the impression that touches the plaster index.
Try
not to modify any portion of the impression that touches the plaster index.
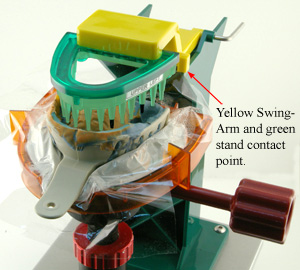
Rotate the Pin-Locator and Swing-Arm 180 degrees until the "stops" on the yellow
Swing-Arm make contact with the green
stand (see red arrow).
Use the three red parts on the Pouring Jig to make adjustments.
![]() Very
few impressions will have the third molars,
as most people have them removed
at an early age. If the third molar is missing in the impression, very
often the impression material will get in the way of the third molar
pointer on the Pin-Locator. You can cut off about half of the third
molar pointer on most Pin-Locators, but you may want to
order some extra unaltered ones for
those occasions when the third molar is included in the impression. This
will save a lot of work trimming away impression material behind the
second molar.
Very
few impressions will have the third molars,
as most people have them removed
at an early age. If the third molar is missing in the impression, very
often the impression material will get in the way of the third molar
pointer on the Pin-Locator. You can cut off about half of the third
molar pointer on most Pin-Locators, but you may want to
order some extra unaltered ones for
those occasions when the third molar is included in the impression. This
will save a lot of work trimming away impression material behind the
second molar.
![]() Making
adjustments to the Pouring Jig using the three red adjustments parts (red handle,
red knob and red nut) will seem awkward at first, but with a little practice you
will find it relatively easy and intuitive. See following page for complete instructions.
Making
adjustments to the Pouring Jig using the three red adjustments parts (red handle,
red knob and red nut) will seem awkward at first, but with a little practice you
will find it relatively easy and intuitive. See following page for complete instructions.
Home Page > 1 2 3 4 5 6 7 8 9 10 11 12 13 14 15 16 17 18 19 20 21 22 23 24 25 26